DVR model HDR-PJ650V, please use the following link:
https://www.sony.com/
Videos can be watched on a computer by installing this PlayMemories Home software:
https://support.d-imaging.
Manual in pdf https://www.sony.com/electronics/support/res/manuals/4450/44501641M.pdf
Inserting a memory card
Insert a memory card into this product.
- Open the cover and insert the memory card until it clicks.
microSD memory card: Insert the memory card straight in the direction shown in figure A until it clicks.
Memory Stick Micro (M2) media: Insert the memory card straight in the direction shown in figure B until it clicks.
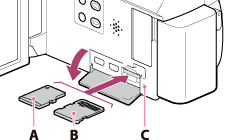
A: Label side
B: Terminal side
C: Access lamp
Note
- To ensure stable operation of the memory card, it is recommended to format the memory card with this product before the first use. Formatting the memory card will erase all the data stored on it and the data will be irrecoverable. Save your important data on your PC, etc.
- If [Failed to create a new Image Database File. It may be possible that there is not enough free space.] is displayed, format the memory card.
- Confirm the direction of the memory card. If you forcibly insert the memory card in the wrong direction, the memory card, memory card slot, or image data may be damaged.
- Do not insert any memory card other than those that fit into the memory card slot. Doing so may cause a malfunction.
- When inserting or ejecting the memory card, be careful so that the memory card does not pop out and drop.
- Memory card will not be recognized by this product unless it is inserted straight in the correct direction.
The following types of memory cards can be used with this product.
URL:: https://helpguide.sony.net/cam/1420/v1/en/contents/TP0000557748.html
Types of Memory Stick media you can use with this product
In this Help Guide, the following Memory Stick media you can use with this product is called Memory Stick Micro media.
- Memory Stick Micro (Mark2) media
Note
- Memory Stick Micro media with a capacity up to 16 GB have been confirmed to operate properly with this product.
Types of SD memory card you can use with this product
In this Help Guide, the following types of microSD cards you can use with this product are called “microSD card.”
- microSD memory card
- microSDHC memory card
- microSDXC memory card
Note
- For recording movies, use the card of Class 4 or faster.
- When recording images in XAVC S format, use a microSDXC memory card of Class 10 or faster.
- microSD cards with a capacity up to 64 GB have been confirmed to operate properly with this product.
- If [Preparing image database file. Please wait.] is displayed, wait until the message disappears.
Hint
- To eject the memory card, open the cover and lightly push the memory card in once.
Supplied items
Camcorder (1)
AC Adaptor (1)

- The shape of the AC Adaptor varies depending on the countries/regions.
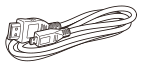
HDMI cable (1)
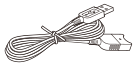
USB connection support cable (1)
Rechargeable battery pack NP-FV50 (1)

- When using this product while connected to a wall outlet (wall socket), such as while charging, make sure to attach the battery pack to this product.
“Operating Guide” (1)
Hint
- The USB connection support cable is designed for use with this product only. Use this cable when the Built-in USB Cable of this product is too short for connection.

Charging time
Approximate time (min.) required when you fully charge a fully discharged battery pack.
When using the AC Adaptor
- NP-FV50 (supplied):
- 165 min
- NP-FV70:
- 260 min
- NP-FV100:
- 420 min
When using your computer
- NP-FV50 (supplied):
- 305 min
- NP-FV70:
- 555 min
- NP-FV100:
- 930 min
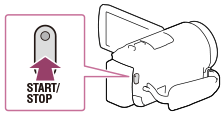
Recording movies
Record movies.
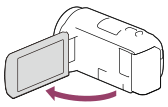
- Open the LCD monitor of this product and turn the power on.
- Press START/STOP to start recording.
- To stop recording, press START/STOP again.
Note
- If you close the LCD monitor while recording movies, this product stops recording.
- The maximum continuous recordable time of a movie is about 13 hours.
- When an AVCHD movie file exceeds 2 GB, the next movie file is created automatically.
- When an MP4 movie file exceeds 4 GB, the next movie file is created automatically.
- The following states will be indicated if data is still being written onto the recording media after recording has finished. During this time, do not apply shock or vibration to this product, or remove the battery pack or AC Adaptor.
- Access lamp is lit or flashing
- The media icon in the upper right of the LCD monitor is flashing
- The LCD monitor of this product can display recording images across the entire monitor (full pixel display). However, this may cause slight trimming of the top, bottom, right, and left edges of images when played back on a TV which is not compatible with full pixel display. It is recommended you record images with [Grid Line] set to [On] using the outer frame of [Grid Line] as a guide.
- Check the subject on the LCD monitor, and then start recording.
- If the lens cover does not fully open, only a black screen and sound may be recorded.
- If you record, covering the microphone on the bottom of this product, such as by attaching a tripod, you may not obtain the best audio performance.
Hint
- In the default setting, this product records an AVCHD movie and MP4 movie simultaneously in the movie recording mode. When you do not want to record an MP4 movie, set [Dual Video REC] to [Off].
- RECORDING: link
- Open the LCD monitor of this product and turn the power on.
https://helpguide.sony.net/cam/1420/v1/en/contents/TP0000557749.html
Dual Video REC
 - [Image Quality/Size] - [Dual Video REC] - desired setting.
Descriptions of menu items
- On (default setting):
- Records an MP4 movie while recording an HD movie.
- Off:
- Does not record an MP4 movie while recording an HD movie.
Note
- When any of the following conditions are met, [Dual Video REC] will be set to [Off].
- When [
 REC Mode] is set to [60p Quality
  (1080 60i-compatible device)]/[50p Quality (1080 50i-compatible device)].
 - When [File Format] is set to [
 XAVC S HD] and [Frame Rate] is set to 60p (1080 60i-compatible device)/50p (1080 50i-compatible device).
 - During [Live Streaming]
- During [Multi Camera Control]
- When [
You can set the dual recording mode (recording an MP4 movie during movie recording) to on or off.
Sensor
SENSOR TYPE
1/5.8 in (3.1 mm) back-illuminated Exmor R® CMOS sensor
EFFECTIVE PIXELS (STILL IMAGE)
approx. 2.29 Megapixels (16:9)/approx. 1.71 Megapixels (4:3)
EFFECTIVE PIXELS (VIDEO)
approx. 2.29 Megapixels (16:9) 1
Processor
IMAGE PROCESSOR
BIONZ X™ image processor
Lens
FOCAL LENGTH (35MM EQUIVALENT) (STILL IMAGE)
f=26.8–804.0 mm (16:9), f=32.8–984.0 mm (4:3)
LENS COVER
Auto
FOCAL LENGTH (35 MM EQUIVALENT) (VIDEO)
f=26.8–804.0 mm (16:9) 1
FILTER DIAMETER
1.81 in
LENS TYPE
G Lens
MINIMUM FOCUS DISTANCE
approx. 13/32" (Wide), approx. 31 1/2" (Tele), approx. 1 cm (Wide), approx. 80 cm (Tele)
FOCAL DISTANCE
f = 1.9-57.0 mm
APERTURE
F1.8–F4.0


