Wednesday, July 6, 2022

Google SITES tips and tricks

 I am familiar in creating websites on low budget for clients.

I searched about tips and tricks, I need to read and take note, as well as create more sites. 

search results as of July 6, 2022

Jan 29, 2021Here are some of the best tips and tricks for using Google Sites in class. (Image credit: Google Sites) Use Google Sites as a resource point. One way to offer students resources, which are spread across the year, is to place it all on a website. This makes it not only accessible but keeps it organized for the teacher and students.
1) Copy Header. When you add a page to the new Google Sites, you get a blank header. If you want a common theme throughout the site the trick is to first click on the page that has the banner you want to reuse. Then when you click the plus icon to add a new page, the same banner is copied over.
Google Sites Tips. Home Google Sites Tips. Tips and tricks are very helpful to get the work done effectively and in less time. If you own a website in Google Sites, these Google Sites tips will help you to get things faster. Sites tips will help you in designing your Google Sites website in more attractive way
Jan 3, 20215. Kicking it old-school. For the ultimate retro throwback, type in "atari breakout" in a Google image search and you can play the game for a nice dose of nostalgia. 6. Flip a coin. If you ...
Sep 30, 2021Build out your Google Site - add whatever layout, theme, branding, and content you want to use as the foundation for this site. Visit the Site template gallery - Click on the template gallery and then select your domain templates. Submit your site to the template gallery - Look for the upload template button.


EMF - Electromagnetic Field articles and information


Convinced Wi-Fi is making them sick, they’re covering their homes in foil or moving to the desert. Now they’re terrified the 5G revolution will leave them with nowhere to go.

Tuesday, June 28, 2022

Are you fed up of spam calls?

 Updated information on July 6, 2022


NGL is the latest popular anonymous messaging app

The app is targeted at teens and blowing up in Apple's App Store


No wander as of yesterday, I have been getting so many text and phone messages! It's so annoying! Wasting my time and energy blocking them! How about you? How do you deal with it?

===================


 https://getpocket.com/explore/item/stop-giving-companies-your-phone-number-do-this-instead

Stop Giving Companies Your Phone Number. Do This Instead.

Facebook and Twitter admit that marketers accessed the phone numbers people gave them for security verification. Here’s how to protect yourself without handing over your digits.

Fast Company

NOTE: I have my main account under my real name on FB with my personal phone linked to it.

However, I had another one for business and used my google phone number. FB never sent me the verfication last month. So I have no access to that account. FYI I had that account for at least 15 years and now I cannot access it....

That made me rethink Facebook. And also all the communities I manage there. I have parallel communities on LinkedIn, just in case.

 What's your experience with the google phone number and other apps that FORCE YOU to have 2 way authentication and phone number?

Friday, May 13, 2022

Getting "file too" large notice for backing up files

 I had already uploaded about 200 gb of client's files to their external 1TB drive. One file was gave the following message "too large for the destination file system"

Too bad, I had already uploaded all the over 90 files and this just one file was giving me hard time!.

I researched and found out that I had to tweak the drive. However, I was going to lose all the data on file!

I backed up the files and this is how to format

1. File system change to NTFS

2. Allocation to default

and let it format.

I hope this helps!

Friday, April 22, 2022

Sony DVR model HDR-PJ650V manual


DVR model HDR-PJ650V, please  use the following link:


https://www.sony.com/electronics/support/memory-camcorders-hdr-pj-series/hdr-pj650v/manuals


Videos can be watched on a computer by installing this PlayMemories Home software:


https://support.d-imaging.sony.co.jp/www/disoft/int/playmemories-home/en/index.html


Manual in pdf https://www.sony.com/electronics/support/res/manuals/4450/44501641M.pdf


Inserting a memory card


Insert a memory card into this product.

  1. Open the cover and insert the memory card until it clicks.
    • microSD memory card: Insert the memory card straight in the direction shown in figure A until it clicks.

    • Memory Stick Micro (M2) media: Insert the memory card straight in the direction shown in figure B until it clicks.
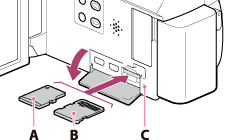
    A: Label side

    B: Terminal side

    C: Access lamp

Note

  • To ensure stable operation of the memory card, it is recommended to format the memory card with this product before the first use. Formatting the memory card will erase all the data stored on it and the data will be irrecoverable. Save your important data on your PC, etc.
  • If [Failed to create a new Image Database File. It may be possible that there is not enough free space.] is displayed, format the memory card.
  • Confirm the direction of the memory card. If you forcibly insert the memory card in the wrong direction, the memory card, memory card slot, or image data may be damaged.
  • Do not insert any memory card other than those that fit into the memory card slot. Doing so may cause a malfunction.
  • When inserting or ejecting the memory card, be careful so that the memory card does not pop out and drop.
  • Memory card will not be recognized by this product unless it is inserted straight in the correct direction.

The following types of memory cards can be used with this product.

URL:: https://helpguide.sony.net/cam/1420/v1/en/contents/TP0000557748.html

Types of Memory Stick media you can use with this product

In this Help Guide, the following Memory Stick media you can use with this product is called Memory Stick Micro media.

  • Memory Stick Micro (Mark2) media

Note

  • Memory Stick Micro media with a capacity up to 16 GB have been confirmed to operate properly with this product.

Types of SD memory card you can use with this product

In this Help Guide, the following types of microSD cards you can use with this product are called “microSD card.”

  • microSD memory card
  • microSDHC memory card
  • microSDXC memory card

Note

  • For recording movies, use the card of Class 4 or faster.
  • When recording images in XAVC S format, use a microSDXC memory card of Class 10 or faster.
  • microSD cards with a capacity up to 64 GB have been confirmed to operate properly with this product.
  • If [Preparing image database file. Please wait.] is displayed, wait until the message disappears.

Hint

  • To eject the memory card, open the cover and lightly push the memory card in once.

Supplied items


Camcorder (1)

AC Adaptor (1)

  • The shape of the AC Adaptor varies depending on the countries/regions.

HDMI cable (1)

USB connection support cable (1)

Rechargeable battery pack NP-FV50 (1)

  • When using this product while connected to a wall outlet (wall socket), such as while charging, make sure to attach the battery pack to this product.

Operating Guide” (1)

Hint

  • The USB connection support cable is designed for use with this product only. Use this cable when the Built-in USB Cable of this product is too short for connection.

Charging time


Approximate time (min.) required when you fully charge a fully discharged battery pack.

When using the AC Adaptor

NP-FV50 (supplied):
165 min
NP-FV70:
260 min
NP-FV100:
420 min

When using your computer

NP-FV50 (supplied):
305 min
NP-FV70:
555 min
NP-FV100:
930 min

Recording movies

Record movies.

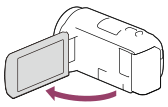
  1. Open the LCD monitor of this product and turn the power on.

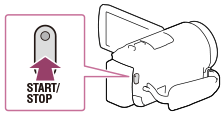
  2. Press START/STOP to start recording.
    • To stop recording, press START/STOP again.

Note

  • If you close the LCD monitor while recording movies, this product stops recording.
  • The maximum continuous recordable time of a movie is about 13 hours.
  • When an AVCHD movie file exceeds 2 GB, the next movie file is created automatically.
  • When an MP4 movie file exceeds 4 GB, the next movie file is created automatically.
  • The following states will be indicated if data is still being written onto the recording media after recording has finished. During this time, do not apply shock or vibration to this product, or remove the battery pack or AC Adaptor.
    • Access lamp is lit or flashing
    • The media icon in the upper right of the LCD monitor is flashing
  • The LCD monitor of this product can display recording images across the entire monitor (full pixel display). However, this may cause slight trimming of the top, bottom, right, and left edges of images when played back on a TV which is not compatible with full pixel display. It is recommended you record images with [Grid Line] set to [On] using the outer frame of [Grid Line] as a guide.
  • Check the subject on the LCD monitor, and then start recording.
  • If the lens cover does not fully open, only a black screen and sound may be recorded.
  • If you record, covering the microphone on the bottom of this product, such as by attaching a tripod, you may not obtain the best audio performance.

Hint

  • In the default setting, this product records an AVCHD movie and MP4 movie simultaneously in the movie recording mode. When you do not want to record an MP4 movie, set [Dual Video REC] to [Off].
  • RECORDING: link

https://helpguide.sony.net/cam/1420/v1/en/contents/TP0000557749.html


Dual Video REC

  1.  - [Image Quality/Size] - [Dual Video REC] - desired setting.

Descriptions of menu items

On (default setting):
Records an MP4 movie while recording an HD movie.
Off:
Does not record an MP4 movie while recording an HD movie.

Note

  • When any of the following conditions are met, [Dual Video REC] will be set to [Off].
    • When [REC Mode] is set to [60p Quality  (1080 60i-compatible device)]/[50p Quality  (1080 50i-compatible device)].
    • When [File Format] is set to [XAVC S HD] and [Frame Rate] is set to 60p (1080 60i-compatible device)/50p (1080 50i-compatible device).
    • During [Live Streaming]
    • During [Multi Camera Control]

You can set the dual recording mode (recording an MP4 movie during movie recording) to on or off.


      • SENSOR TYPE

        1/5.8 in (3.1 mm) back-illuminated Exmor R® CMOS sensor

      • EFFECTIVE PIXELS (STILL IMAGE)

        approx. 2.29 Megapixels (16:9)/approx. 1.71 Megapixels (4:3)

      • EFFECTIVE PIXELS (VIDEO)

        approx. 2.29 Megapixels (16:9) 1

      • IMAGE PROCESSOR

        BIONZ X™ image processor

      • FOCAL LENGTH (35MM EQUIVALENT) (STILL IMAGE)

        f=26.8–804.0 mm (16:9), f=32.8–984.0 mm (4:3)

      • LENS COVER

        Auto

      • FOCAL LENGTH (35 MM EQUIVALENT) (VIDEO)

        f=26.8–804.0 mm (16:9) 1

      • FILTER DIAMETER

        1.81 in

      • LENS TYPE

        G Lens

      • MINIMUM FOCUS DISTANCE

        approx. 13/32" (Wide), approx. 31 1/2" (Tele), approx. 1 cm (Wide), approx. 80 cm (Tele)

      • FOCAL DISTANCE

        f = 1.9-57.0 mm

      • APERTURE

        F1.8–F4.0

Why my laptops are so slow

 Yesterday, I wasted so much time converting files. This morning I wanted to start fresh and figure out what was wrong, before seeing a tech...